Tuesday, 24 December 2019

O Christmas Tree

Hi peeps!
Wishing you all a lovely peaceful Christmas! I hope it's filled with lots of lovely pressies and happy memories! Here's my last Christmas card of the decade!

As always I started this card by trimming some white pearlised cardstock for the base and piece of smooth white cardstock to the same size. I ink blended the smooth white card with Distress Oxide ink pads in the colours Worn Lipstick, Picked Raspberry and Wilted Violet. I then splattered this with white gouache for the snow effect.
I die cut the tree scene from Hello Bluebird, five times and layered for depth, I used some gorgeous glitter cardstock from Lawn Fawn for the top layer. I used this cardstock again for the snowy hillside and a stitched hillside die also from Lawn Fawn. 
I stamped the cute wee woodland critters and tree from Hello Bluebird onto Strathmore Bristol smooth cardstock with an Archival ink pad, coloured them with my Zig Clean Colour Real Brush pens and fussy cut them out.
I stamped the sentiment with a Versamark ink pad onto black cardstock and heat embossed it with white embossing powder. And for the finishing touch I applied Stickles Frosted Lace glitter glue onto the bear's hat!
Thank you for visiting today!
Kelly. xx

Thursday, 19 December 2019

Special Delivery

Hi peeps!
I'm back with another Christmas card! I tried to make the background look like a sunset, not entirely sure I've achieved that but the colours are pretty ;D

I trimmed a piece of white pearlised card for the base, I then trimmed a smooth white piece of card to the same size and ink blended with Distress Oxide ink pads in the colours Wild Honey and Tattered Rose.
I die cut the adorable treehouse from Hello Bluebird out of some very pretty glitter card from Lawn Fawn and die cut the door and window frames out of coloured cardstock. I also trimmed some dark yellow cardstock to fit behind the door and windows so it looked like there was a nice warm glow coming from inside.
I stamped the cute wee critters and present piles from Hello Bluebird with an Archival ink pad onto Strathmore Bristol smooth cardstock, coloured them with my Zig Clean Color Real Brush pens and fussy cut them out. I also stamped the sentiments with a Lawn Fawn ink pad and cut them into a flag shape.
I assembled the card together using double-sided tape and 3D foam and for the finishing touches I dotted snow with a Sakura white gelly roll pen, used some Stickles Frosted Lace glitter glue on the robins hats and around the sentiments and then popped a few white gems on.
Thank you for visiting today :)
Kelly. xx

Wednesday, 18 December 2019

Let It Snow

Hiya peeps
Hope everyone's well. I've still been making crimbo cards this week! So here's the first one.........

I started this card off by trimming a piece of white pearlised card, then I die cut the background using a scene die from Hello Bluebird. I ink blended this with Distress Oxide ink pads in the colours Broken China and Stormy Sky.
I stamped the cute wee critters, also from Hello Bluebird, with an Archival ink pad onto Strathmore Bristol cardstock, coloured them with my Zig Clean Color Real Brush pens and dotted here and there with a Sakura white jelly roll pen and fussy cut them out.
I die cut the sentiment four or five times and layered for depth. I assembled the card together with double-sided tape and 3D foam.
For the finishing touches I popped some Stickles Stardust glitter glue on the hillsides and a few gems on the snowy background.
Thank you for visiting today!
Kelly. xx

Tuesday, 3 December 2019

Bunny Stars

Hi peeps
Hope everyone's well. I have a couple of sweet wee bunnies from Hello Bluebird to share with you today.......

So to start with I stamped the bunnies onto Strathmore Bristol Smooth cardstock with an Archival ink pad, coloured them with my Zig Clean Color Real Brush pens and fussy cut them out.
I then die cut the card bases and base panels with a Lawn Fawn star die and made a frame from the same dies, which I die cut 4 times and layered for depth.
I then ink blended the base panels with Distress Oxide inks in the colours Picked Raspberry and Broken China. For the snow I splattered white acrylic paint on and dotted white Nuvo Crystal Drops on the background too.
For the snowy ground I simply cut white card into a wavy shape and heat embossed it with some WOW! White Puff Twinkle embossing powder.
I die cut some wee trees and dotted them with Stickles Frosted Lace glitter glue and for the finishing touch I popped a gem star on and voila! Finished!
Thank you for visiting today :)
Kelly. xx

Thursday, 21 November 2019

Birthday Bubbly

Hiya peeps
Hope everyone is well. I was asked to make a 60th birthday card for this week and a shaker card using this fab wine glass shaker die (from My Favorite Things) immediately sprang to mind!

To start, I trimmed the card base from white pearlised card and the base panel from smooth plain white card, I ink blended the base panel with Distress Oxides in the colours Tattered Rose and Wild Honey.
Then for the gold metallic splatters I used a Distress Stain Spray in the colour Tarnished Brass. I die cut the sentiment (from Mama Elephant) five times and layered them, then did the same with the wine glass. 
I then popped one of the shaker pouches into the wine glass, filled it with lots of lovely sequins, which I get from Little Things From Lucy's Cards, adhered a piece of acetate on the back of this and glued everything down onto the base panel.
And for the finishing touches, I die cut the number 60 and glued to the front of the wine glass and popped a few gems on! Voila!
Thank you for visiting today :)
Kelly. xx

Wednesday, 13 November 2019

Monster Birthday

Hiya peeps
I'm back with a card I've made for my nephew's birthday today and for once this card has turned out how I imagined it in my head! ;D
So for starters I trimmed some card for the base and die cut the base panel. I then ink blended the panel with Distress Oxide in the colour Tumbled Glass and used a confetti stencil from Newton's Nook with the colour Wilted Violet.
I then cut out two number 8's from a template, embossed one of them with an old embossing folder then inked them with the colours Wilted Violet and Barn Door. For the shaker part I stuck some acetate on the back of the numbers and 3D foam and filled them with sprinkles.
Then for my favourite part I stamped these cute monsters from Avery Elle onto Botanical ultra smooth watercolour paper, painted them with my Faber Castell watercolour pencils and fussy cut them out.
Then I put 3D foam on the back of them and assembled the card together and for the finishing touch I popped a few purple gems here and there.
Thank you for visiting today.
Kelly. xx

Thursday, 7 November 2019

Warm Winter Wishes

Hi peeps!
I'm back with another Christmas card featuring a couple of cute critters from Hello Bluebird. Note to self: I do not need any more new stamps! ;D
So to start off with I trimmed a piece of white pearlised card for the card base. I then die cut the framed tree scene die (also from Hello Bluebird), ink blended the tree with Distress Oxides in the colours Antique Linen, Forest Moss and Vintage Photo and embossed with WOW! White Puff Twinkle embossing glitter. I embossed the ground with this too.
For the sky I ink blended with Tumbled Glass using a cloud stencil from My Favorite Things.
For the next part I stamped the two cuties and the log onto Botanical ultra smooth watercolour card, painted them with my Faber Castell watercolour pencils and fussy cut them out.
I then assembled everything together and for the finishing touches, I stuck ultra fine Flower Soft to their hats for a fluffy effect and stamped a sentiment from the same stamp set above their heads!
Thank you for visiting today.
Kelly. xx

Monday, 4 November 2019

November In Bloom

Hi peeps
I was feeling very floral at the weekend and ended up making a set of cards reflecting my mood ;D
For all of my cards I trimmed the base from white linen effect card and die cut each panel from coloured card, ink blended them with Distress Oxides and sprayed with water.
The first card was done with a peach coloured panel and ink blended with Carved Pumpkin and Barn Door.
The second card was made with a pale yellow panel and ink blended with Mustard Seed and Wild Honey.
The third card was made with a pale pink panel and ink blended with Picked Raspberry.
And finally the fourth card was made with a pale blue panel, ink blended with Tumbled Glass and dotted with a Sakura white gelly roll pen. 
I stamped all of the images (from Woodware Stamps) onto Botanical ultra smooth watercolour card, fussy cut them out and painted them with my Faber Castell watercolour pencils. I then stamped a sentiment (from Clearly Besotted) on each card, stuck the images down with 3D foam pads and for the final touch a few wee gems!
Thank you for visiting today.
Kelly. xx

Tuesday, 29 October 2019

Joy!

Hiya peeps!
A bit of a wet day here in Lincolnshire, so a perfect excuse to hide away in my craft room and here's what I made ;D
So to start off with, I trimmed the card base from an A4 piece of white linen effect card. I then trimmed a piece of Botanical ultrasmooth watercolour card slightly smaller than the base and using an Archivak ink pad I stamped a background stamp from Stamping Bella onto it. I ink blended the sky using a couple of Distress Oxide ink pads in colours Tumbled Glass and Peacock Feathers. 
I then watercoloured the rest of the scene using my Faber Castell watercolour pencils, dotted snow on the trees with Nuvo crystal drops, then on the hilltop and ice rink with Stickles glitter glue, then sprinkled Glamour Dust over the top.
I then stamped this adorable doggy, fussy cut around him and watercoloured him too, stuck 3D foam on the back and sprinkled Glamour Dust on his ice skates.
I die cut the frame (from Avery Elle) from white card and white craft foam and stuck these together for depth and also did the same for the 'joy' sentiment (from Lawn Fawn).
Oh and for the finishing touch I popped a crystal gem above the word joy! 
Thank you for visiting today :)
Kelly. xx

Sunday, 27 October 2019

Twinkle Twinkle.....

Hi peeps!
I LOVE these adorable wee deers from Hello Bluebird and couldn't wait to ink them up and make a card with them! So here it is!
I started this card off by making the base from white card and die cutting the panel with a stitched rectangle die from My Favorite Things with pale pink card. I then ink blended the pink panel with a Distress Oxide ink pad in Picked Raspberry, spritzed it with water and flicked white acrylic paint mixed with water onto it too.
I then stamped the rooftop and deers on to Botancial ultrasmooth watercolour card, fussy cut them out and painted them with my Faber Castell watercolour pencils. I dotted the deers white spots and eyes with a white Sakura Gelly Roll pen and added a wee bit of glitter on their bells with Glamour Dust.
For the next part I smothered the rooftop and chimney top with clear acrylic glue and Diamond Dust, which sparkles like mad! I backed the rooftop and deers with 3D foam pads and also the panel too and stuck this down onto the base card. 
I die cut the sentiment (from Whimsy Stamps) four times and layered them on top of each other and for the finishing touch popped on a few gem stars!
Thank you for visiting today :)
Kelly. xx

Wednesday, 23 October 2019

Wish Upon A Star

Hiya peeps
I hope everyone's well. I'm back with another shaker card! Yay! I started this card off by making the base and two panels. I used a star stencil from Newton's Nook on the first panel, using Distress Oxide Wilted Violet ink.
I then die cut the stars (with an Avery Elle die) and blended ink with Distress Oxide in Wilted Violet and Vintage Photo.
For the metallic silver splatters I used a Distress Stain spray in Brushed Pewter, which went everywhere! ;D  I then stamped the sentiment with an Encore silver metallic inkpad and ended up going over that with a pearlescent silver paint.......don't as why! I then let all of this dry and stuck acetate on the back of the panel.
For the next part I stuck 3D foam pads around the stars and edges of the panel and very carefully filled each star with fabulous sparkly bits from Little Things From Lucy's Cards. Then I stuck down the first stencilled panel to the card base and then very carefully the second panel.
I then stamped the cute wee bear from Penny Black with Archival ink onto Botanical ultrasmooth watercolour paper, fussy cut around him and painted him with my Faber Castell watercolour pencils. He's then stuck down with 3D foam pads too, then finally a few star gems popped on and that's it! Finished!
Thank you for visiting today :)
Kelly. xx

Saturday, 19 October 2019

'Twas The Night Before Christmas.....

Hi peeps
I'm back with another Christmas shaker card! I said there'd be more! ;D
Image & sentiment stamps: Clearly Besotted
Colouring medium: Faber Castell watercolour pencils
Starry night stencil: Clearly Besotted
Frame die: Whimsy Stamps
Sequins & stars: Little Things From Lucy's Cards 
    Other mediums/materials used: Botanical ultra smooth watercolour paper; Archival inkpad; Distress Oxide inkpad; Versacolor inkpad; Glamour Dust
Thank you for visiting today and enjoy the rest of the weekend peeps!
Kelly. xx

Tuesday, 15 October 2019

A Christmas Angel

Hiya peeps
Haven't done a shaker card for a while, so decided to make one! Really enjoyed it too, so expect to see more! ;D
Image stamp: BeBunni @ Crafter's Companion
Colouring medium: Faber Castell watercolour pencils
Stars stencil: Newton's Nook
Sentiment stamp: Lili Of The Valley
Frame die: Whimsy Stamps 
    Other mediums/materials used: Botanical ultra smooth watercolour paper; Archival inkpad; Distress Oxide inkpad; Versacolor inkpad; Frantage shaved ice; Distress pink glitter; Cosmic Shimmer stars; Stickles glitter glue; Glamour Dust
Thank you for visiting today.
Kelly. xx

Sunday, 13 October 2019

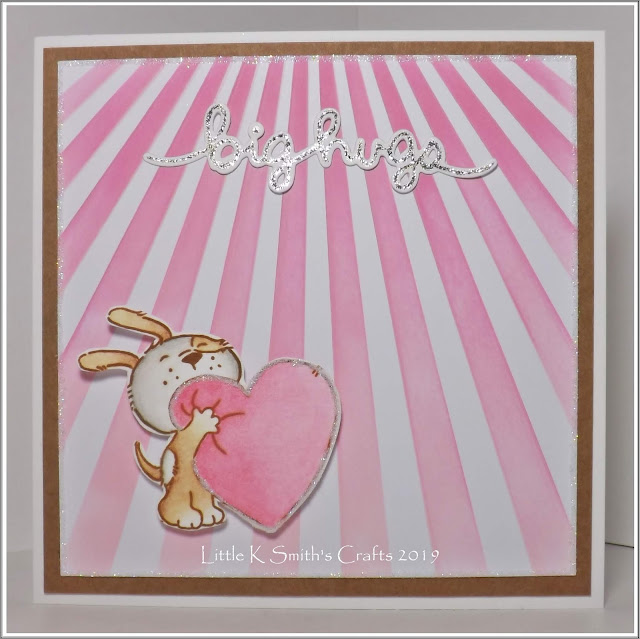
Big Hugs

Hiya peeps
I'm back with a 'quick' get well card using a new stencil, which I'm really pleased with the result :)
Image stamp: Lili Of The Valley
Colouring medium: Faber Castell watercolour pencils
Sun rays stencil: My Favorite Things
Sentiment die: Lawn Fawn 
    Other mediums/materials used: Botanical ultra smooth watercolour paper; Archival inkpad; Distress Oxide inkpads; Stickles glitter glue; Glamour Dust
Thank you for visiting today :)
Kelly. xx
Related Posts with Thumbnails